Crafting Your Woodworking Haven: Setting Up a Simple Workspace
Embarking on your woodworking journey doesn’t require an extravagant workshop. Begin with a straightforward setup in your available space. Whether it’s a backyard, apartment patio, or a designated garage, simplicity is key. This foundational tip ensures a hassle-free start to your woodworking endeavors.
Tip 1: Create a Simple Woodworking Setup
Setting up your workspace is the first step toward a successful woodworking venture. Follow these detailed steps to establish an efficient and practical setup:
- Evaluate Your Space: Assess the available area, whether it’s a backyard or a designated garage. Identify a flat and well-lit space conducive to your woodworking needs.
- Invest in Sawhorses and Plywood: Acquire a pair of sturdy sawhorses and a plywood board from the local home improvement store. This makeshift table provides a stable foundation for your projects.
- Temporary or Permanent Setup: Depending on your space, decide if your woodworking setup will be temporary or permanent. In a garage, aim for a more lasting arrangement, while in an apartment, opt for flexibility.
By creating a simple and practical workspace, you set the stage for an enjoyable woodworking experience.
Precision Matters: Mastering Tape Measure Skills
Tip 2: Learn How to Read a Tape Measure
In the intricate world of woodworking, precision is paramount. Acquiring the skill to decipher precise measurements on a tape measure is crucial. Follow these steps to master the art of reading a tape measure:
- Understand Fractions: Woodworking measurements often involve fractions. Familiarize yourself with common fractions to accurately interpret dimensions.
- Use a Free Printable Guide: Utilize a free printable guide to enhance your understanding of tape measure markings. This resource aids in quick and precise measurements.
- Practice Regularly: Enhance your proficiency by regularly practicing measurements. This hands-on approach ensures you’re comfortable with various measurement scenarios.
By mastering the tape measure, you elevate the accuracy of your cuts and contribute to the overall quality of your woodworking projects.
Navigating Wood Selection: Understanding Lumber Dimensions and Species
Tip 3: Understand Lumber Dimensions and Species
Delve into the world of wood selection by understanding lumber dimensions and species. Follow these steps to navigate the diverse landscape of woodworking materials:
- Explore Wood Species: Familiarize yourself with both softwoods and hardwoods. Identify common species like pine, cedar, oak, and walnut, each offering unique characteristics.
- Decipher Lumber Sizes: Grasp the significance of lumber sizes, such as 1×2 or 2×12. This knowledge empowers you to interpret woodworking plans, shop for lumber, and plan your projects effectively.
- Refer to a Lumber Size Chart: Utilize a lumber size chart to simplify the understanding of different dimensions. This visual aid enhances your ability to select suitable materials.
By comprehending wood species and lumber dimensions, you make informed choices, laying the foundation for successful woodworking endeavors.
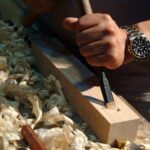
Tip 4: Always Use Straight Wood Boards
Selecting the right wood is an art. Choose straight boards, avoiding warped or bowed alternatives. Develop an eye for identifying imperfections by inspecting the board at a downward angle. Opt for fresh boards, as stores tend to restock before the weekend.
- Inspect at a Downward Angle: When selecting boards, hold them at a downward angle to identify any warping or bowing that may not be immediately apparent.
- Avoid Imperfections: Take the time to pick through the wood pile to find the straightest boards, minimizing future challenges during the building process.
- Consider Store Stocking Patterns: Be mindful of the stocking patterns at your local store. Fresh boards are usually available before the weekend, providing a better selection.
By adhering to these practices, you ensure the quality and integrity of your woodworking materials.
Essential Tools: A Primer for the Beginner Woodworker
Tip 5: Learn How to Use a Few Essential Tools
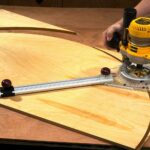
Navigate the vast array of woodworking tools by starting with the basics: miter saw, cordless power drill, random orbital sander, Kreg Jig, and a Brad Nailer. Gradually expand your toolset as your skills progress, unlocking the potential to tackle more complex projects.
- Miter Saw: Master the miter saw for precise and angled cuts. Learn to adjust the settings for various woodworking applications.
- Cordless Power Drill: Familiarize yourself with the cordless power drill, a versatile tool for drilling and driving screws. Learn about different drill bits for various materials.
- Orbital Sander: Understand the orbital sander for efficient and smooth wood finishing. Learn proper sandpaper grit selection for different projects.
- Kreg Jig and Brad Nailer: Explore the functionalities of the Kreg Jig for pocket hole joinery and the brad nailer for secure and discreet fastening.
By gaining proficiency in these essential tools, you lay the groundwork for a successful woodworking journey.
Surface Perfection: The Art of Sanding
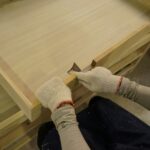
Tip 6: Sand Your Wood
Achieving a flawless wood surface requires proper preparation. Prioritize sanding as a crucial step before staining or finishing your projects. Master the art of wood sanding with an orbital sander, ensuring your wood is ready for the final touches.
- Orbital Sander Basics: Understand the basics of using an orbital sander, including proper grip and movement techniques. Practice on scrap wood to refine your skills.
- Sanding Grits: Learn about different sandpaper grits and their applications. Start with coarser grits for initial sanding and progress to finer grits for a smooth finish.
- Sanding Before Cutting: Incorporate sanding into your pre-cutting routine to ensure thorough wood preparation while the material is still in whole pieces.
By mastering the art of sanding, you enhance the aesthetic appeal and longevity of your woodworking projects.
Your Woodworking Odyssey Begins with Safety in Mind
As you embark on your woodworking adventure, remember that safety is paramount. Follow these essential safety precautions to ensure a secure and enjoyable experience:
- Wear appropriate personal protective equipment (PPE): Safety glasses, gloves, and a dust mask shield you from potential hazards.
- Use sharp tools: Maintain tools in optimal condition to reduce the risk of injury.
- Never leave a running tool unattended: Always switch off tools when not in use to prevent accidents.
- Store tools properly: Safely stow tools to avoid potential harm and maintain their longevity.
- Dispose of hazardous materials properly: Follow proper disposal guidelines for materials that pose a risk.
- Learn the proper techniques for using power tools: Understanding correct usage minimizes the chance of accidents.
- Take breaks often: Combat fatigue by incorporating regular breaks into your woodworking sessions.
- Avoid alcohol or drugs: Ensure a clear mind and focus by refraining from substances that impair judgment.
Your woodworking journey is not just about creativity and craftsmanship; it’s also about cultivating a safe and secure environment. By incorporating these safety measures, you can fully enjoy the art of woodworking while minimizing risks.
You can get your woodworking plans suitable for Beginners & Pros!